
A Quick List to Get Going
To make your own video studio for Udemy courses, it’s worth putting in a little time and investment upfront to get a great and consistent quality set up to produce your courses. The choice of equipment can be overwhelming, so here is a brief checklist that you can follow to get going on making your own online course videos.
Note: TeachinGuide is not affiliated with any of the products or courses mentioned in this article and does not receive any commission on sales.
Steps to make your Own Video Studio:
As a first step, you must decide what kind of videos you are making: Talking head or screencast, or a bit of both? Can’t decide? Take a look at Step 2 of TeachinGuide’s Beginner’s Guide for more information on types of courses you can create.
Talking Head Videos Equipment
- A high-quality microphone
- A decent quality camera with tripod
- Good lighting equipment or great natural light
- Optional seamless paper background
- Video editing software
Screencast Videos Equipment
For screencast videos, before making your video, you must decide what type of screencast you will do: slides only or on-screen activity to show students what you are doing.
For screencast videos you need to have two pieces of equipment:
- A
high quality microphone (for voiceovers) - Screencasting software
Microphones
When making your own vidoes, it can be tempting to just use the microphone on your phone or camera. But these will not produce quality sound up to Udemy (and student ) course standards. If you don’t know a lot about microphones, the choice and potential expense can be overwhelming.
Following is a list of microphones that many many instructors and experts have suggested using when making your own videos.
- Wearable microphone – These are cheap and convenient in that you just clip them on and are especially useful for screencasting. Udemy recommends the Sony ECMCS3 which is a low-cost option at around $20.
- Blue Yeti Microphones – For years this microphone has been the most popular for making home videos. Over 7000 4-5
star Amazon reviews prove this. Udemy recommends this microphone as well.
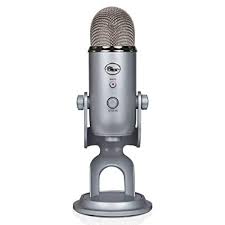
The Blue Yeti is highly recommended for screencast lectures. It retails for around $130 but is very easy to use and involves just one step to set it up so it is great for beginners and the audio quality is very high.
- Samson Go Mic – this is one of Udemy’s recommendations. It is highly portable and offers a lot of accessories such as a podcast package.
Iphone audio – iPhones now have a decent microphone. You can use your memo app to record audio. However this cheap alternative doesbrings a couple of downsides.
To use your phone, you will have to mount your phone above your head (out of view) on a light stand or other attachment. You will also have to get good at hitting the record button on your camera and phone at the same time so that later on you can sync the audio and video using editing software.
Hint: clapping your hands at the beginning and end of a module recording will make it easier to sync audio and video later on.
Cameras for Talking Head Videos
- iPhone – Clearly this is the easiest and most natural option for making your own videos. The iPhone has
high -quality video. You willof course need a tripod.
- Logitech C920 webcam – A camera like this is a great option if you want to do both screencasting and occasional talking head videos. It’s simple to use and easy to plug in.

The Logitech webcam is reasonably priced at about $100. However, it is best to use a different microphone, like the Blue Yeti, with it because often you will get
Lighting Equipment
When filming talking head videos in particular, you need to have good lighting in your studio. Your video recording space should be well lit with no shadows on your face or in the background. Before purchasing lighting equipment, try out all of your lights and lamps.
- Softbox lights – Softbox lights enable you to direct light to the exact spot in the shot, and they make lighting subjects and particular parts of a scene much easier. Soft boxes are available in all shapes and sizes at very reasonable prices, and they are a standard part of the equipment used for making home videos.
One commonly used product is the LimoStudio 700W Photography Softbox Light Lighting Kit. It costs about $60. There is a variety of other options on Amazon.com that are very affordable.
- Umbrella lights – umbrella lights provide a much broader source of light than the softbox lights and they are frequently used to light a larger scene, so for example if you are doing a cooking demonstration or some kind of
hands on activity requiring space you might want to consider these.
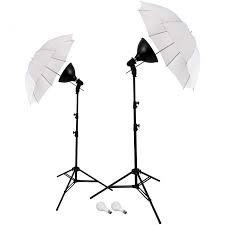
You can also add extra light on the video’s subject if you’re looking to get a more balanced shot. They are portable and quite handy if you often shoot on different locations since you can easily pack and carry them to wherever you plan on shooting your next YouTube video.
Screencasting Software
- For Windows Users –
- Camtasia is by far the most popular video edting software. You can record literally anything that is on your screen. There is no risk with it as you can download a free trial to see if its for you and your video making needs.
- For Apple users – Screenflow is the most popular editing software for Mac users. You can also try a free trial.
- For both Operating Systems
- Open Broadcaster Software (OBS) runs on Windows, Mac and Linux. Its primary advantage is that it is free and open source.
- ScreenCast-O-Matic – another free and easy to use screen recorder, it may not have all the bells and whistles but plenty of online teachers use this go-to editor.
Looking for comparisons of these software packages? Here are some useful links:
Video Editing Software
If you are screencasting, the software solutions above will allow you to edit your videos. When it comes to video editing, it can be daunting to have to both choose
It’s also a good idea to read up on the latest in software and how it integrates with new camera features. Here is a recent article that compares and reviews Video Editing options.
Here are some popular go to editors for making your own videos:
- Adobe Premiere Pro is very popular with experienced Udemy instructors and people who are comfortable with more professional equipment. It has all the basics but has a lot more functionality than most. That said it can be somewhat complicated to manage your workflow.
- Apple iMovie – This editor is well known and appreciate by Mac users for its simple interface and professional looking themes. It’s fairly easy to get started with.
- Corel Video Studio Ultimate – this is also a solid video editing package for beginning and experienced instructors alike. It consistently gets good reviews.
Optional Background
Ever wonder how talking head videos get that “blue screen” effect? If you want to have a generic background in your videos, you can use a seamless paper background such as Savage Seamless Paper. It’s inexpensive, so it may be worth having on hand for making your own videos.
The Udemy Course on Creating Videos
Udemy has created its own official free course on How to Film Your Videos, It has several very handy PDF downloads including audio hacks and equipment lists.
5 Comments
Pingback: Become a Udemy Instructor – 10 Steps - Blog | TeachinGuide
Pingback: Teach Online – 6 Steps to Prepare Yourself - Blog | TeachinGuide
Pingback: How Much Does It Cost to Create an Online Course? - Blog | TeachinGuide
Given that you have an open-source recording software, I wanted to mention an open source video editing software as well. It is called OpenShot (https://www.openshot.org/) and has good capabilities for editing both audio and video and still keeping them aligned.
Making the video and edit them is great art, to edit the video you can learn about the editing software, many of the editing software is there some of them are:
1: Final Cut pro
2: Sony Vegas.
3: filmora.
4: Adobe Premiere Pro
and many more, check best video editing courses here: https://techsherlock.com/best-video-editing-courses/